Card
The Card page displays panels containing card overview details and card limits, and provides card management tools and controls.
Card Overview
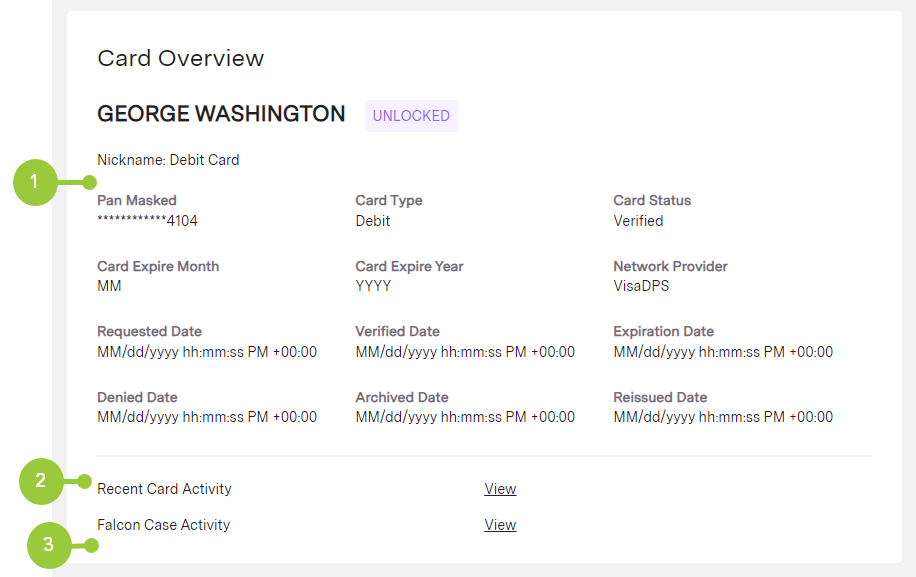
The card overview panel displays card details and provides hyperlinks to view Recent Card Activity and Falcon Case Activity.
The Card Overview panel contains the following items:
-
View details in the following columns:
-
Nickname—displays a user-friendly name that applies to the card
-
Pan Masked—displays the masked value of the PAN (Primary Account Number) for the card
-
Card Type—indicates the type of card
-
Card Status—indicates the card status
-
Card Expire Month—displays the month the card expired or will expire
-
Card Expire Year—displays the 4-digit year the card expired or will expire
-
Network Provider—indicates the vendor type code
-
Requested Date—displays the date the request to create the card was sent to the card provider
-
Verified Date—displays the date the card status was set to Verified
-
Expiration Date—displays the date the card status was set to Expired
-
Denied Date—displays the date the card status was set to Denied
-
Archived Date—displays the date the card status was set to Archived
-
Reissued Date—displays the date the card status was set to Reissued
-
-
Select the View hyperlink to view the Card Usage Analysis page.
-
Select the View hyperlink to view the Fraud Case Activity Data page.
Card Management
Temporary and permanent card lock
Helix offers two solutions for servicing debit cards: a temporary lock or a permanent lock. A temporary lock will disable the debit card until it is made active again. A permanent lock will permanently disable the card. This action cannot be undone.
| Action | Type | Description |
|---|---|---|
| Unlock | Temporary | The card is temporarily unlocked from locked status and can be used within its predetermined limits. |
| Lock | Temporary | The card is temporarily locked. |
| Hotlist | Permanent | The card and Primary Account Number (PAN) are disabled. A debit card must be placed in Hotlisted status if the customer reports the card as Lost, Stolen, or if fraudulent activity has occurred. Hotlisting a card immediately stops all attempted transactions. The debit card must be reissued with a new PAN. |
| Reissue with new PAN | Permanent | The card is immediately hotlisted and a new card is issued with a new PAN. A card should be reissued with a new PAN any time the card has been reported as lost, stolen, or if there is suspected fraud. |
| Reissue with existing PAN | Permanent | A new card is issued using the existing PAN. The customer can use their current card until the new card is activated. A card should be reissued with the existing PAN if the card is physically damaged or if the customer has had a name change. |
| Archive | Permanent | The card and the associated PAN are archived. The account cannot be closed while the debit card is still attached to the account. |
| Remove Account | Permanent | An account is removed from a card. |
| Add Account | Permanent | An account is added to a card. Up to four accounts can be associated to a single card. |
| Reassign Primary Account | Permanent | The primary account for a card is reassigned. |
A user can unlock a card temporarily from a locked status.
- Perform a customer search and select Card from the side navigation menu.
-
The Card Overview page displays. Select the Card Id hyperlink of the appropriate card.
- The Card Overview page displays. From the Temporary actions in the Card Management Features pane, select Unlock.
-
The Confirmation page displays. Select Proceed.
- The Card List displays with the updated Card Status.
A user can place a temporary lock on a card.
- Perform a customer search and select Card from the side navigation menu.
- The Card Overview page displays. Select the Card Id hyperlink of the appropriate card.
-
The Card Overview page displays. Expand Other Actions in the Card Management pane, then select Lock.
- The Confirmation page displays. Select the reason the card must be locked from the Lock Type list (e.g., Temporary (Customer Can Unlock)). Values are:
- Administrative—The client must unlock the card through Helix Admin Console.
- Temporary (Customer Can Unlock)—The customer can unlock through the client's application.
Click Proceed.
- The Card List displays with the updated Card Status.
A user can hotlist a debit card in the event it is lost or stolen.
- Perform a customer search and select Card from the side navigation menu.
- The Card Overview page displays. Select the Card Id hyperlink of the appropriate card.
-
The Card Overview page displays. From the Permanent actions in the Card Management pane, select Hotlist.
- The Confirmation page displays. Select the reason the card must be hotlisted from the Reason drop-down menu (e.g., Lost). Values are:
- ACCOUNT CLOSURE—Indicates the account associated with the card was closed.
- DECEASED—Indicates the cardholder is deceased.
- DESTROYED—Indicates the card was destroyed.
- DUE TO UPGRADE—Indicates the card was closed due to an upgrade. This applies to prepaid cards only.
- ESCHEATMENT—Indicates the card is dormant.
- FRAUD—Indicates there is suspected fraud.
- LOST—Indicates the card is lost.
- STALE—Indicates the card exceeded the expiration period to be sold. This applies to prepaid cards only.
- STOLEN—Indicates the card was stolen.
- VOIDED—Indicates the card was closed due to voided issuance. This applies to prepaid cards only.
Click Proceed.
-
The Card List displays with the updated Card Status.
A user can archive a card in the event the account to which the account was attached is closed. The card must be archived before the account can be closed.
- Perform a customer search and select Card from the side navigation menu.
- The Card Overview page displays. Select the Card Id hyperlink of the appropriate card.
-
The Card Overview page displays. From the Permanent actions in the Card Management pane, select Archive.
-
The Confirmation page displays. Click Proceed.
- The Card List displays with the updated Card Status.
A user can reset verification attempts for a card in Denied status.
- Perform a customer search and select Card from the side navigation menu.
- The Card Overview page displays. Select the Card Id hyperlink of the appropriate card.
-
The Card Overview page displays. From the Actions in the Card Management pane, select Reset Verification Attempts.
- The Confirmation page displays. Select Proceed.
-
The Card Overview page displays with the updated Card Status.
A user can reissue a card with a new primary account number (PAN) in the event the previous one is lost, stolen, or there is fraudulent activity.
- Perform a customer search and select Card from the side navigation menu.
-
The Card Overview page displays. Select the Card Id hyperlink of the appropriate card.
- The Card Overview page displays. From the Permanent actions in the Card Management Features pane, select Reissue with new PAN.
-
The Confirm Card Re-Issue page displays. Establish the following:
-
Qualifier Code (Optional)—Enter the code provided by CPI to indicate the type of card stock required.
-
Reason—Select the reason the card must be reissued from the Reason drop-down list (e.g., Lost).
-
Compromised—Indicates the card may have been compromised.
-
Lost—Indicates the card is lost.
-
Name Change—Indicates a new card number is requested due to a name change. Enter the following:
-
First Name
-
Middle Name (optional)
-
Last Name
-
-
Stolen—Indicates the card is stolen.
-
Suspected Fraudulent—Indicates there is suspected fraud.
-
Select Proceed.
-
- The Card List displays with the updated Card Status.
A user can reissue or renew a card and keep it active until a new one arrives, based on client settings. The current card must not be hotlisted, as once a card is hotlisted, a new card with a new primary account number (PAN) is issued.
- Perform a customer search and select Card from the side navigation menu.
-
The Card Overview page displays. Select the Card Id hyperlink of the appropriate card.
- The Card Overview page displays. From the Permanent actions in the Card Management Features pane, select Reissue with existing PAN.
-
The Confirm Card Re-Issue page displays. Establish the following:
-
QualifierCode—Enter the code provided by CPI to indicate the type of card stock required.
-
Reason—Select the reason the card must be reissued from the Reason drop-down list (e.g., Lost).
-
Damaged—Indicates the card is damaged. Existing cards with this value must be unlocked and remain unlocked until the card order is received by the card print vendor (e.g., CPI)
-
Name Change—Indicates the customer requires a name change. Existing cards with this value must be unlocked and remain unlocked until the card order is received by the card print vendor (e.g., CPI)
-
Renewal—Indicates the card needs to be renewed. This includes cards that may not have qualified during the renewal process or if a customer requests a card prior to the renewal process.
-
Select Proceed.
-
- The Card List displays with the updated Card Status.
A user can remove an account from a card.
- Perform a customer search and select Card from the side navigation menu.
- The Card Overview page displays. Select the Card Id hyperlink of the appropriate card.
-
The Card Overview page displays. From the Permanent actions in the Card Management Features pane, select Remove Account.
- The Confirmation page displays. From the Account To Remove list, select the account you want to remove. Select Proceed.
-
The Card Overview page displays. A message displays indicating the account was successfully removed from the card.
A user can add an account to a card.
- Perform a customer search and select Card from the side navigation menu.
- The Card Overview page displays. Select the Card Id hyperlink of the appropriate card.
-
The Card Overview page displays. From the Permanent actions in the Card Management Features pane, select Add Account.
- The Confirmation page displays. Establish the following and select Proceed.
Up to four accounts can be associated to a single card.
Account To Add—Select the account to be added from the list
Priority To Add—Select the priority to be assigned to the account
An account with a priority level of 1 will serve as the primary account on the card and fund transactions. If a new account is assigned 1, all subsequent accounts decrease by one level.
- The Card Overview page displays. A message displays indicating the account was successfully added to the card.
A user can reassign a primary account to a card.
- Perform a customer search and select Card from the side navigation menu.
- The Card Overview page displays. Select the Card Id hyperlink of the appropriate card.
-
The Card Overview page displays. From the Permanent actions in the Card Management Features pane, select Reassign Primary Account.
- The Confirmation page displays. Select the account to be reassigned as the primary account from the Account To Reassign as Primary list and select Proceed.
-
The Card Overview page displays. A message displays indicating the account was successfully reassigned as the primary account for the card.
- Perform a customer search and select Card from the side navigation menu.
- The Card Overview page displays. Select the Card Id hyperlink of the appropriate card.
- The Card Overview page displays. From the Permanent actions in the Card Management Features pane, select Remove Account.
- The Confirmation page displays. From the Account To Remove list, select the account you want to remove. Select Proceed.
- The Card Overview page displays. A message displays indicating the account was successfully removed from the card.
- Perform a customer search and select Card from the side navigation menu.
- The Card Overview page displays. Select the Card Id hyperlink of the appropriate card.
- The Card Overview page displays. From the Permanent actions in the Card Management Features pane, select Add Account.
- The Confirmation page displays. Establish the following and select Proceed.
Up to four accounts can be associated to a single card.
Account To Add—Select the account to be added from the list
Priority To Add—Select the priority to be assigned to the account
An account with a priority level of 1 will serve as the primary account on the card and fund transactions. If a new account is assigned 1, all subsequent accounts decrease by one level.
- The Card Overview page displays. A message displays indicating the account was successfully added to the card.
- Perform a customer search and select Card from the side navigation menu.
- The Card Overview page displays. Select the Card Id hyperlink of the appropriate card.
- The Card Overview page displays. From the Permanent actions in the Card Management Features pane, select Reassign Primary Account.
- The Confirmation page displays. Select the account to be reassigned as the primary account from the Account To Reassign as Primary list and select Proceed.
- The Card Overview page displays. A message displays indicating the account was successfully reassigned as the primary account for the card.
-
Perform a customer search and select Card from the side navigation menu.
-
The Card Overview page displays. Select Recent Card Activity.
-
A list of recent transactions displays. The Program Result column indicates the decisioning result of each transaction.
-
For more information on a Program Result, select the description of a transaction in the Description column.
-
The Transaction Details window displays.
-
Select the Risk Management dropdown to display Program Result.
-
Perform a customer search and select Card from the side navigation menu.
-
The Card Overview page displays. Select the card in which the customer would like to opt-in to/opt-out from receiving fraud text alerts.
-
The Card Management box displays. The current status is indicated next to the Fraud Text Alerts badge.
-
If the current status is OPTED IN, and to opt out to not receive fraud text alerts, select Opt Out.
-
If the current status is OPTED OUT, and to opt in to receive fraud text alerts, select Opt In.
-
-
Based on the selection in the previous step, the Opt Out of Fraud Text Alerts or Opt In to Fraud Text Alerts box displays.
-
To confirm your selection, select Opt Out or Opt In.
-
-
A message displays indicating the action is successful.
Helix requires up to 24 hours for the change to take effect.